It's the dead of winter, you're already cold, and you go to take a shower to warm up but the water's ice cold. Guess what? Your pilot light it is out on you water heater. So, now you have to go downstairs, or into some dark closet, open up the panel on your water heater and light the pilot light. Uh oh, there's a problem, you don't know how to light a pilot light...doh!
Well, today's your lucky day. I'm going to teach you exactly what to do when your pilot light is out. I'll also show you some other helpful guides as well as direct you to some YouTube videos that will offer further assistance. Don't worry, you'll have that pilot light going in no time and your hot water will be back before you know it. Then, you can get back to taking that shower with hot water, but first... let's get our hands dirty!
Checking the Pilot Light on a Water Heater
The first thing you're going to want to do is check the pilot light to make sure that's actually the problem. If you have an electric water heater, this article is not for you. Gas water heaters are the only water heaters that have a pilot light, so you have another problem. For those of you with gas water heaters, let's get started.
Go to your water heater and open up the front cover of the water heater. Depending on your model of water heater, your pilot light might be in a slightly different location, but you should see some area where a flame is burning. Usually this is a small box or little window that allows you to view the pilot light.
Now, if you don't see a flame and you don't feel any heat coming off where you think the flame should be, your pilot light is out. You may even see a blinking light if you have an LED indicator. Open your manual and check to see what the blinking light indicates. If the lighting corresponds to a pilot light out, then you're on the right track.
Safety Before Lighting the Pilot Light on a Water Heater
Before you get started with even thinking about relighting your pilot light, there are some steps you are going to want to take beforehand to ensure everything it is safe to light a flame around your water heater.
Complete these steps to ensure the water heater is safe to light:
- Turn off the water heater. This is usually indicated by "off" on the dial. If not, check your manual.
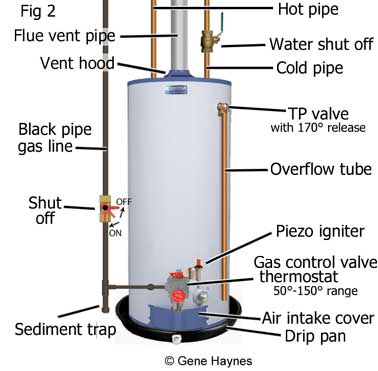
- Turn off the gas to the water heater. You'll want to find the pipe coming into the water heater. Make sure the valve is set to the off position (the "shut off" in the above diagram). The valve is in the off position if the valve is perpendicular to the pipe. If the valve is going in the same direction as the pipe, turn the valve one quarter turn to shut the valve.
- Turn the water heater to the lowest setting. You can only turn the temperature valve ("gas control valve thermostat," pictured above) two ways. Make sure you turn it to the lowest temperate setting. If you're unsure which direction is which, check your water heater manual.
- Check for any gas by smelling. You should always check to see if you smell any gas before lighting your pilot light. If you smell gas, do not attempt to light the pilot light. Wait approximately 5-10 minutes after shutting off the gas valve, then check for the gas smell again. If you still smell gas, you may have a gas leak and you should contact your utility company to have them check for a gas leak and immediately leave the area.
- Wait five minutes with the gas in the off position. Even if you didn't smell any gas, it's good practice just to wait to make sure that all residual gas is gone anyways. This is just an extra level of safety
Once you know the area is free from gas and that the area is safe you can continue with the instruction for lighting the pilot light. However, be absolutely sure that you followed all of these steps and you don't smell any gas whatsoever.
Instructions for How to Light a Pilot Light
Okay, you know everything is safe and you're finally ready to light that pilot light!
Make sure you have some matches or a lighter in order to complete this step. Also, if you want to wear some fire-resistant safety glasses, that's up to you. Before starting, be sure to open the front cover ("air intake cover" on the schematic) on your water heater, which is usually below all the dials. If not, stay low to the ground and look for the cover then remove it.
Steps for lighting a water heater pilot light:
- Turn the water heater to the "pilot" position. This is normally done by turning the dial so that the word "pilot" so that it is facing the front. If you have an arrow or some other indicator that shows which position is on follow that. If unsure, consult your water heater's manual.
- Turn the gas valve back on. Again, this is when the valve is parallel, or in the same direction, as the gas pipe leading into the water heater.
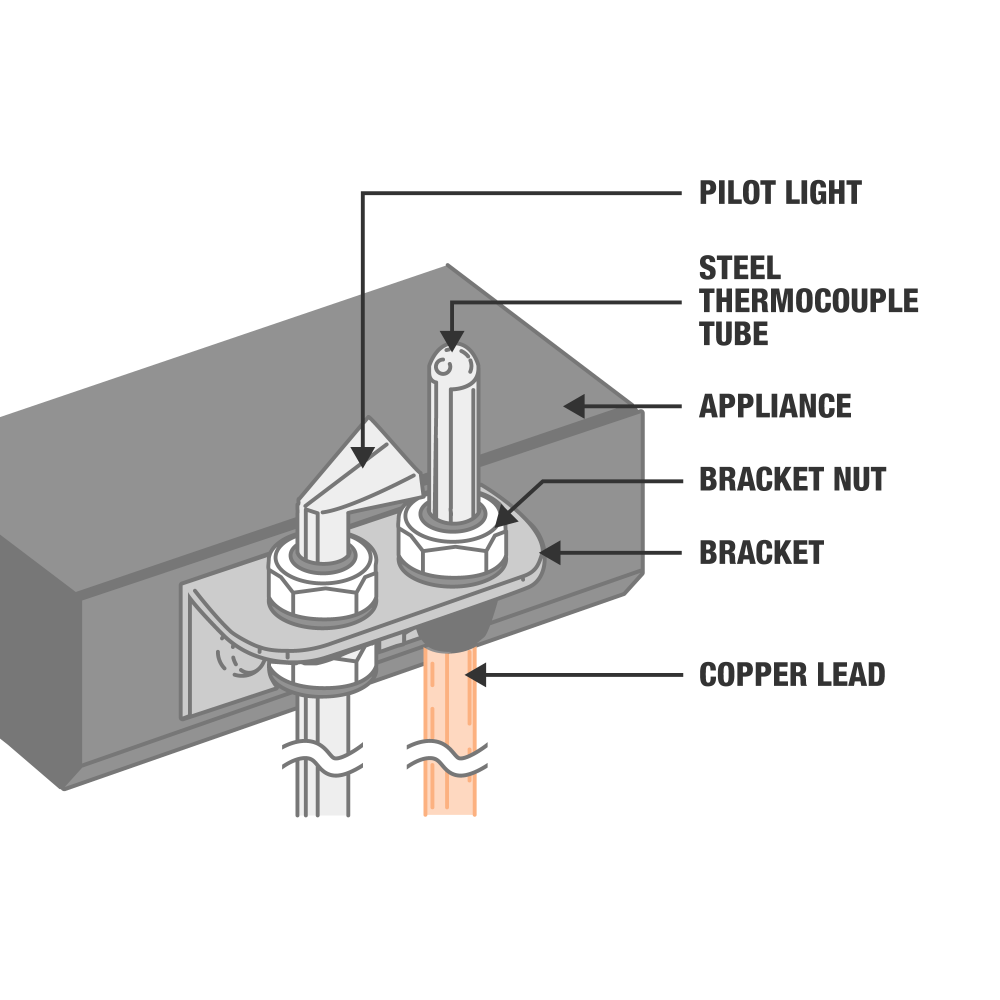
- Simultaneously hold down the button next to the dial and the striker button. There are two buttons, one next to the dial that says "pilot" and "off," which is generally wider, shorter and fatter. Then, there is another button which is slender that generally has a copper wire going to it. These are the two buttons to press. Press the shorter button and then the striker (longer button, aka the Piezo igniter) simultaneously. See note in italics below if you are having trouble with this step.
- Check the pilot light to make sure it is lit and keep holding the smaller, wider button. This button should be held for approximately one minute while your pilot light is lit.
- Let go of the button and check that the pilot light is still lit. If the pilot light goes out, repeat the process above from step 3. If it is lit, move onto the next step.
- Turn the water heater dial to the "on" position. Now your water heater is back to the on position and operating normally. Double-check to make sure the pilot light is still on.
- Turn the temperature dial back to the desired temperature. Once you've turned the temperature to the desired position it'll take a while for the water to heat back up. Depending on the size of your water heater, this may take from 30-60 minutes. Periodically check your water temperature from a faucet after about 30 minutes until you have hot water.
Put the cover back on your water heater if you haven't already. Now, you're ready to go take that well-deserved shower! If for any reason any of these steps didn't work and your pilot light is still not lit, turn off the water heater by repeating the above steps from the "Safety Before Lighting the Pilot Light on a Water Heater" section. Next, follow the "Troubleshooting a Pilot Light" section below.
Note: Your water heater may have a different ignition button which may not require simultaneously holding two buttons. If this is the case, please consult your water heater's manual for how to ignite the pilot light or how to operate the Piezo igniter.
Troubleshooting a Pilot Light That Won't Light
It's a common misconception that problems only happen to older water heaters. Whether you have a newer or older water heater, sometimes the pilot light won't stay lit for various reasons.
Here are the most common problems why a pilot light won't stay lit:
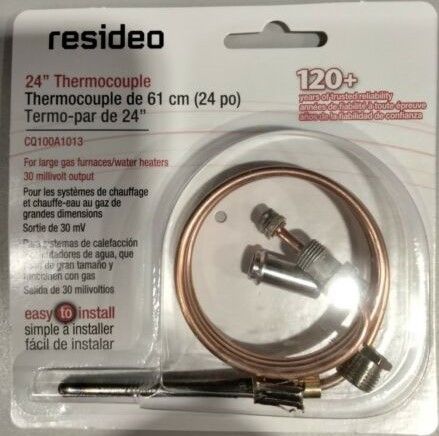
- Faulty thermocouple that needs replaced. This is a common issue on some models, especially some Whirlpool models. Replacing a thermocouple voids the warranty, so make sure you know all that before replacing your thermocouple. However, replacing the thermocouple will should cost you less than $20 (sometimes even less than $10), so it's a good option to try.
- Build-up on the thermocouple itself. This is a pretty common issue with some older water heaters and can be fixed quickly by cleaning the thermocouple with a Scotch Brite pad (this works really well).
- Bent thermocouple. You'll have to take apart your thermocouple to diagnose this issue. However, if the thermocouple is bent, simply bend it back into place and then retest the pilot light.
- Limit switch has tripped and needs reset (more common) or a limit switch that needs to be replaced (more rare).
- Pilot light needs to "warm up" before lighting. Quick fix– hold a lighter underneath the pilot light for a bit before trying to light the pilot light to ensure it is warm enough.
- Build-up or gunk inside one of the tubes blocking the flow of gas or air. This isn't a common issue but if you have an older water heater that's been sitting for a while, this could be an issue.
- Pilot light has some build-up on it and needs cleaned. This might be the case if your pilot light tends to flicker before turning off. It's to the point where it wants to stay lit but the gunk is preventing it from doing so. You can simple clean the pilot light
- Pilot light that needs to be replaced. Try to find a new pilot light by typing in pilot light and your make and model of the water heater at this link.
So these are the most common problems for why a pilot light will not stay lit. However, there are not all the reasons why a pilot light won't stay lit on your water heater. There are a lot of possibilities, but it's best to rule out the most common ones first before going down the rabbit hole. Hopefully one of these helped and you're on your way back to hot water again.
Diagnosing a Faulty Thermocouple on a Water Heater
DIY water heater troubleshooting isn't that complicated, but you have to have the right tools. Given the fact that replacing a faulty thermocouple is fairly cheap, it's worth the trouble to see if your thermocouple is actually faulty. Following a few simple steps will allow you to quickly diagnoses a thermocouple issue. Be sure to follow all safety guidelines before troubleshooting your water heater.
How to troubleshoot a thermocouple on a hot water heater:
- Disconnect the thermocouple wire from the hot water heater. This is generally a copper wire which runs straight up to the dial on the water heater. It'll also be the wire closest to the dial.
- Using a multimeter, turn the setting to volts.
- Connect the multimeter's red wire (positive) to the copper wire that is used to connect the thermocouple. Connect the black wire (negative) to the silver piece on very top of the thermocouple's wire.
- Attempt to turn your pilot light on and hold down the short knob to keep the pilot light lit. Hold this down for at least a minute.
- Check the reading on the multimeter. The reading so be at least 20mV. If the reading is not 20mV then the issue has been determined. If it reads 20mV, or close to 20mV, then the thermocouple is fine and doesn't need replaced.
If you've determined the thermocouple is the issue, you'll have to take apart the thermocouple assembly to diagnose the problem thoroughly. Check for buildup on the thermocouple, the alignment of the thermocouple, a bent thermocouple, or any other noticeable issues. If you don't see any noticeable problems, your thermocouple will most likely need to be replaced.